Saturday, February 25, 2012

DIY closet revamp {part 2}

I never posted after revamping my closets back in September. I didn't take proper before photos, so here's one I dug up from before I moved in:

The bedroom has two closets - one awkwardly behind the bedroom door and the other in the mini-hallway to the bathroom. The closets had typical bi-fold doors with dated brass knob (and also notice the white walls and carpet). Inside was also pretty basic and certainly did not maximize storage - notice how neither closet has a proper hanger rod and how the left closet just has a super deep shelf in the left (deeper) side:


My closet upgrades happened in two phases:
1// I replaced the interior shelves with shiny new ones from the Container Store (elfa).
2// I converted the bi-fold doors to "French" doors and added new handles.

Going in chronological order, the interior upgrades
allowed for multiple shelves as well as multiple levels of hanging space (hallway closet):

At the bottom there is space for a small suitcase and bins for clothes awaiting hand washing and dry cleaning.

This upgrade also really took advantage of the space in the other closet, which has two different depths. On the left (deeper) side I was able to include an additional hanging rod for dresses, and shoe racks running the entire depth. There's even room for my steamer to hide in there now!


Some of the major advantages to converting the doors are the increased access and the extra hanging space on the back of doors for purses (above) and a mirror (yes, that's little versions of my sister and me!):
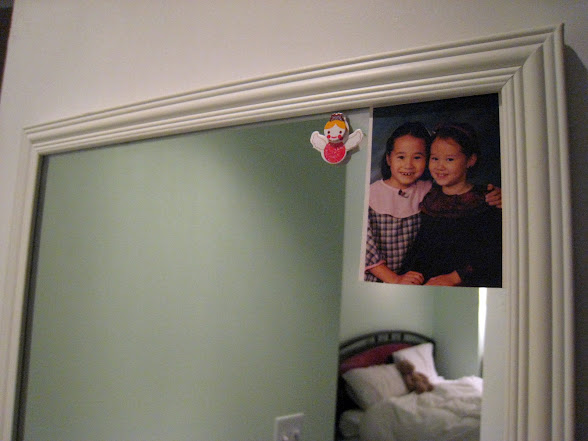

As for the bi-fold to French door conversion, I first took the doors down and removed the hinges which had previously held the two pieces together. In typical bi-fold doors, one side is anchored to the floor and the top track while the other side slides. I modified the sliding side to also be anchored by adding hardware to allow both doors to swing open independently (ahh the closeup is ugly I promise I vacuum!):


After patching up holes from the hinges and adding a fresh coat of paint, I attached a magnet to each closet door frame and metal strikers to the backs of the newly separated doors to keep them from swinging around all crazy:


Finally, I added the new handles and voila!


For funsies, the before and after again:


friday night is...

...sushi date night! Complete with dirty martinis, fizzy moscato, and of course sushi! Another little "tradition" we love. Here's a selection of what we had last night (delivery from Fin's). Clockwise from top: Christmas maki, Idaho maki, Rainbow maki, Alaskan maki, and Mexican maki. Yum..


All served on the sushi dunk plates I got us for Christmas (from CB2). Aren't they fun?!

Tuesday, February 14, 2012

happy valentine's day!

... from me, (and from google - so cute!)


Wishing you all little bits of happiness today. May you all have someone to jumprope with.

And special happy wishes to my wifey on her birthday - Love you, Liz!

Sunday, February 12, 2012

let there be light! {part 2}

The bathroom. is. beautiful.

It took far longer than initially expected, but things are looking goooood now! If you remember from my previous post, the lights were off center and ugly. So my mission was to cover over the right-hand junction box (which took many layers of spackle but patience was key) and then modify the light fixture's mounting plate to accommodate off-center wiring and mounting. Here's the before:

After spackling about 5 layers (and sanding once or twice in between) the right side was looking like this:

I then started to focus on the left - the power source for the new fixture. With the help of Adam's dad, we had extra holes drilled in the left of the mounting plate to accommodate hanging the fixture skewed from the junction box. I made marks on the right for additional heavy-duty drywall anchors and mounting to the stud.

OK so there wasn't actually a stud there, but some mysterious metal strip running along the drywall which the studfinder reacted to.. hence all the extra investigatory holes. Owell more drywall anchors will do.

After some sanding and three layers of paint, things finally started looking better:

And once that paint dried, we were ready to mount! Finallyyyy the final product (sorry about the weird color balance.. taking photos of lights isn't the easiest):


And also, some long-overdue beauty shots of the bathroom, including the new towel rod (gifted from Mom - leftover from the Baltimore home renovation), newly-painted cabinets with new handles, and assorted glass containers for makeup.


If any of you remember my post about painting chevrons way back, I did try it but didn't feel I had enough continuous wall for it to really read, so I went with the solid peach / pink.


ps. Adam uses the other bathroom so the pink and large display of makeup don't bother him at all. In fact he never comes in here haha

To recap, the before and after:


food from the week

I've gotten much better at photo-documenting my life - or in this case, the food I make / eat - but have not been keeping up with the posting quite as well. Here are some of the dinners from this week:


bowtie pasta with sun dried tomato chicken sausage and sauteed zucchini and onions
&
spinach, apple, dried cranberry, walnut, and blue cheese salad topped with homemade balsamic vinaigrette


tofu fried rice with green pepper, onion, zucchini, and corn


roasted sweet potatoes seasoned with rosemary and sea salt
&
burgers topped with caramelized onions and muenster cheese on Portuguese rolls
&
baby romaine salad topped with homemade balsamic vinaigrette and crumbled blue cheese


arugula and goat cheese ravioli and panko-crusted chicken tenders topped with sauteed balsamic onions and baby portabello mushrooms
&
parmesan asparagus

Saturday, February 4, 2012

let there be light!

The light situation in my bathroom is sad. The fixtures that came with the place are these dated oblong glass globes mounted on the wall (read: ugly). To make it worse, they are spaced really awkwardly. Check out the spacing (minus the glass, and yes the bulbs on the right have died):

Lucky for me, my dad is just the person to provide a solution. A while back he made this mock-up for me:

Basically I can mount a single fixture that is centered on the wall (!!!) and powered off of the left electrical supply. The one on the right won't be necessary and can be killed & covered. The fixture is this one he designed:

On Monday my new bathroom fixture showed up! I am so excited to install it, and have been busy prepping today. Hopefully next week these guys will be up and ready to show off.

Oh and I think I found a chandelier too! So much exciting lighting

Thursday, February 2, 2012

thursday night is...

...burrito night! It's a super-delicious weekly "tradition" we really love

ground turkey, onion, baby portabella mushrooms, green pepper, corn, plus lots of spices & seasoning

whole wheat tortilla, rice, shredded cheese

anddd fresh salsa, guacamole, and bbq sauce

The extra perk is the leftover turkey, veggies, and rice turn into weekend brunch (plus eggs, extra seasoning, and lots of cheese!) yum..