The final part! Well, at least for now. The hallway bathroom certainly isn't done, but all the heavy lifting is over. After putting some new bathroom accessories in place, cleaning and repairing the shower tile, and installing a new glass shower door, we ended up here:

While I'm calling this the final part, there are a few things we still want to complete:
- Hang artwork in the big blank space over the toilet
- Buy a soap pump (yes I looked at your votes!)
- Find a new trash can
- Buy matching hand towels, bath towels, and a bath mat
- Stain and seal the floor grout
- Frame the mirror (maybe)
- Buy a new robe hook for the back of the door (maybe)
- Replace the shower valve (maybe)
But for now it's "done". Picking up where we left off last time, here's how we got there!
If you missed it and want to catch up, you can find Parts 1, 2, and 3 of the hallway bathroom facelift here, here, and here.
12// Making those shelves pretty & functional
The vanity base isn't the most beautiful thing ever, but a major reason why we wanted to keep it was its functionality. Had we replaced it with a smaller vanity or a pedestal sink, we would have lost that shelf space on the left:

The best storage & beauty solution I could think of was matching bins. They would sit on the shelves, serving to hide the stuff there while also maximizing storage, sorta like drawers (which aren't possible here because they would run into the toilet when open).
Finding the right bins was pretty tough because of the strange dimensions of the shelves, plus I wanted something that was durable, pretty, and resistant to moisture - essentially something other than the canvas storage bins you see everywhere.
 After months of looking (seriously, months) I had decided to buy these guys from the Container Store. You may have noticed they were hanging out in my Wish List on the right-hand sidebar for a while.
 I figured I could paint them a glossy white to match the shelves and call it a day. They were the right dimensions and had the clean lines I was looking for. Plus, people seemed to like them from the reviews.
But while perusing a sale at Crate&Barrel we stumbled upon these beauties, which came home with us immediately:

After testing the size (they fit!!!) we stuck some felt feet on them to prevent scratching the new paint job on the shelves...


...and filled them right up. Oh happy day!

13// Picking bathroom accessories
Picking out the new towel rod and toilet paper holder was one of the hardest decisions. But I knew anything would be better than what was in there before:

After lots of agonizing, ranking, and re-ranking I ended up ordering 3 different sets from Home Depot. We ultimately went with these guys, which look so much better in person than the renderings:
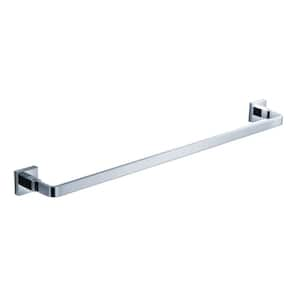

Figuring out where exactly to mount them was a bit of a battle since we were space-constrained between the tp holder (I didn't want the towel rod to hang over it like before), a light switch, and the door. Some discussion boards helped us figure out appropriate mounting heights (my favorite was towel = boob height and tp = butt height!) After nudging things around a bit, mounting was quick and simple and we ended up here:


It's starting to look like a real bathroom now!

14// Repairing tile & installing a shower door
Yes, I saved the best for last: the shower door! It's been hiding from most of the pictures to date, partially because the bathroom is small and hard to photograph, but mostly because it was ugly. Here's the before:

A combination of the wavy plastic and the door hinge's location practically in the middle of the shower opening made it feel pretty dingy and claustrophobic, especially from the inside.


So we ripped that guy out, making way for some much-needed cleaning (and a better door!)


Once I got all that gunk and glue and everything off, I scrubbed down the tile, removed all the old caulking from the corners, and identified all the weak spots needing repair.


Since it worked well last time, I used the same products as I used in the other bathroom to patch the holes then whiten & seal all of the grout.

With everything cleaned up, we installed the new door! We decided on a "frameless" glass door from Home Depot (Keystone by MAAX - Insight).
Installing it took about 6 hours, and a lot happened along the way but I didn't document much of it. Most notably, we drilled tile (which took up most of the time) and went crazy with silicone sealant to make sure no water leaks. Look how pretty!


It feels a million times brighter, bigger, and cleaner in there! After a couple weeks of use we are loving it, and even the glass door is staying pretty clean.
Hooray new bathroom!
No comments:
Post a Comment