Showing posts with label diy. Show all posts

Sunday, February 24, 2013

baby steps {part 2}

Boom.  New microwave installed.

Keeping an OTR microwave wasn't my #1 choice especially because of how low it hangs, but it's what made the most sense for now.  Even though I'm not a big fan of temporary solutions, I'm glad we did this.  That old guy was made in 1989 and was probably slowly poisoning us every time we turned it on.  RIP buddy.  Here's the before and after (sorry about wonky white balance):

Cara was in town this weekend.  She imparted some family wisdom: to expect projects to be more "2 stones for one bird" than "2 birds with one stone".  Killing this one took 8 stones.  

Saturday, February 23, 2013

baby steps

Step 1, phase 1 of kitchen renovation complete.  The dead microwave is gone. 

I'm loving how open it feels.  Also took off the edging strip for the cabinet on the right.  I think it looks so much better.  Creamy carrot & grape soup on the stove (sounds strange, but was super good!).  New installation tomorrow!

Thursday, September 6, 2012

details

Even though I've been struggling to get projects done, we have made some progress!  Let's see, shall we?  As I mentioned last time, I embarked on repainting all the trim in the apartment.  In doing something like this, it was the natural opportunity to swap out old hardware.  Here's a glimpse at what our old hinges looked like:

Aren't you a gem.

Well now we have these instead:

Much better, yes?  And check out the shiny fresh paint job!  (Okay I have to admit there's one door / hinge combo left to do, but I'll get there soon!)

Thursday, August 23, 2012

project a.d.d.

I've had a lot of trouble focusing on completing projects recently.  The hallway bath is hovering at about 90% complete, but those last unfinished items are really lingering (we did get a trash can though!).  Meanwhile I started repainting all the doors and trim in the apartment, but only finished 2 of the 4 doors (including install of new non-gross hinges!) so the paint can is just sitting in the hall.  

Then about 3 weeks ago I had some oral surgery done, which really had me pooped.  So most home time was dedicated to sleeping and and lounging with bags of ice on my face.  Perhaps that's why I haven't gotten much done, at least in a physical sense.  However, I've done lots of thinking and researching, and there are a few projects bouncing around in my head lately.  


1// the kitchen
This isn't a new topic, but we've made some progress!  

I finally got blueprints from the building, which show that there isn't any major plumbing, HVAC, or electrical reason why I can't cut into that wall.  Yay!

Wednesday, July 25, 2012

a bathroom facelift {part 4}

The final part! Well, at least for now. The hallway bathroom certainly isn't done, but all the heavy lifting is over. After putting some new bathroom accessories in place, cleaning and repairing the shower tile, and installing a new glass shower door, we ended up here: 

While I'm calling this the final part, there are a few things we still want to complete:
  1. Hang artwork in the big blank space over the toilet
  2. Buy a soap pump (yes I looked at your votes!)
  3. Find a new trash can 
  4. Buy matching hand towels, bath towels, and a bath mat
  5. Stain and seal the floor grout 
  6. Frame the mirror (maybe)
  7. Buy a new robe hook for the back of the door (maybe)
  8. Replace the shower valve (maybe)
But for now it's "done".  Picking up where we left off last time, here's how we got there!

Wednesday, July 11, 2012

a bathroom facelift {part 3}

Part 3!  We install a vanity top, a faucet, and redo some plumbing!  I am the most proud of this part so far because I thought we might have to give up and call a plumber.. but we didn't.  And it looks awesome.  And nothing leaks (!!!)

Here's where we end up:


Now let's see how we got there, yea?

Incase you missed it and want to catch up, you can find Parts 1 and 2 of the hallway bathroom facelift here and here.

Sunday, July 1, 2012

a bathroom facelift {part 2}

Guess what?  I'm finally done my weekly trips to Ann Arbor!  Made the flight from DTW to BOS for the last time (for a while, at least) on Friday afternoon.  I was so excited to return home and relax for the rest of the day, but was met with an even bigger surprise - Adam had arranged to work from home so he was there to meet me.  This worked out really well too, since we had a large freight shipment coming in that day... the new shower door!  I won't get to that yet in this post, but coming soon.  


6// Painting the vanity

We decided to keep the old vanity base, but to spruce it up with a fresh coat of paint, some caulking to fill in cracks / seams, and new cabinet handles.  Here's what we were dealing with before:

Wednesday, June 27, 2012

a bathroom facelift {part 1}

A while back (ok, a long while back) I alluded to some planned "renovations" to our hallway bathroom.  I've been waiting until I had something exciting to share.  I've decided that moment is now.  

I know you're so excited to know what paint color we picked, but you get so much more!  Patching holes in walls!  Painting the walls!  Installing a sconce!  Putting in new plumbing!  Designing & installing a custom vanity top!  Finding storage baskets!

The vision was to have a clean, contemporary look that's a little masculine (mostly Adam uses this bathroom) and a bit of a contrast from the rest of the apartment.  I had been feeling inspired by some photos of dark, high-contrast bathrooms and decided to go that route. 

I'll walk through the whole process to date, but let's start with the end.  Very proudly, I present our progress as of last week:

And here's a before photo:

Yep, that's the same bathroom - and we're not even done!  From zoomed out it's hard to see all the beautiful new details, but we'll get there along the way.  


Wednesday, May 2, 2012

mounted!

Helloooooo! I've been silent for a bit - apologies. I have been traveling to Ann Arbor weekly for work which really has me pooped lately. But a post on our TV mounting project is long overdue, so here's at least the start of it. For those of you who may not care at all how we did it, here's the end product: OooooooooooOoOoOoOOOOOoooooooo! Check out how sleek and thin and practically frameless it is! This baby also came with free 3D glasses which work surprisingly well. And after the month+ with the new TV, I must say I'm really enjoying it. The room feels bigger and cleaner, and the actual TV is great too. While I didn't quite capture it well, here's what the before looked like (but ignore the wall mount back there.. photo was taken in progress rather than before like I should have):
Now I know you're dying to read all about how we did it, right?? Well here we go.

Monday, March 26, 2012

dining nook {reveal}

A week or so ago I mentioned a pending project involving the installation of a pendant light, which I actually completed the very next day but just hadn't gotten to posting.  So here it is.

Before, the nook looked like this:

It seemed a bit haphazard to me and was wanting some dressing-up.  My apartment is blessed with high ceilings but I haven't fully taken advantage of that height, with the exception of the curtains.  I wanted to add a chandelier / pendant of course for the functionality, but also to anchor the dining area and draw attention to the height of the room.  There was a cover plate on the ceiling which I hoped indicated the presence of a live junction box, but was not completely sure.  So we borrowed a ladder from maintenance and took a look.

So far so good.  I had to do a bit of sanding to remove excess paint that had built up around the cover but otherwise the process was quite painless.  After a quick consultation with my dad regarding where to attach what to hook up the light switch, and then with Adam to guesstimate the height, we ended up with this:

Loving it!  I thought the shade's diameter would be too small but actually with the extra height I think it fills the space well.  And the design allows for soft light to come through the shade while actually lighting the table quite brightly.  Overall, a great success!  And probably the most impact for $20 in the apartment so far. 

Saturday, March 10, 2012

bathroom (mis)adventures {part 2}

I am pleased to announce my shower "renovation" has been successfully completed!  Actually I have yet to shower in there but here's hoping nothing completely unexpected and tragic happens when I do. 

As a reminder, my plan was to:
1// clean grout and tile with the bathroom cleaner
2// clear out any loose grout and fill in all grout holes
3// coat grout with whitener
4// seal the grout
5// re-caulk everything

In my previous post, I had gotten #1 and part of #2 done when I got diverted.  Picking up where I left off, here are the rest of the details, and the final reveal! 

Day 2, continued:
I waited the prescribed 3 hours for the soap dish to get nicely re-secured to the wall:

As that was wrapping up, I tackled the rest of the caulking.  I was mildly horrified to discover most of it was wet when I pulled it out, indicating leaks.  When all those bits were cleaned up, we were looking like this:

Time to fill all those gaps with grout!  It was so easy - I just cut the tip of the grout tube's nozzle at an angle as instructed and it formed the perfect applicant.  I didn't take any action shots but here's my first attempt (filling the gaps got easier as I got the hang of it):

Following instructions, I wiped up the excess and then let the stuff dry for a good 48 hours before moving on.  

Day 3:
I couldn't quite wait 48 hours before doing anything, so I started applying some of the whitener.  As a reminder, here's my arsenal:
The whitener is applied with the foam nozzle - I felt a bit like I was using white-out for the grout.  Which is guess is essentially true haha.  You're supposed to let it dry 4+ hours then wipe the excess off of the tiles, which was really easy.  Here's an after shot (also, notice the fixed soap dish!)

Day 4:
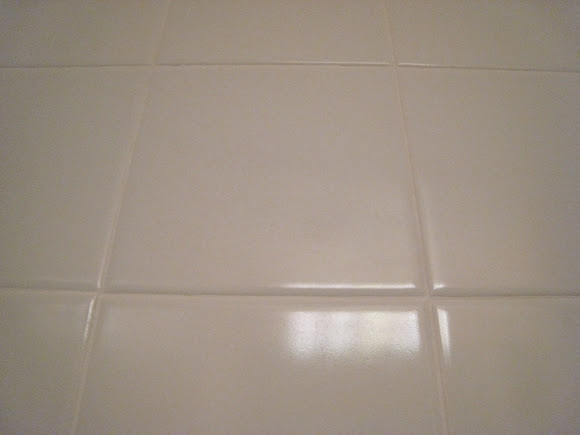
With all the grout dry, I finished up applying the whitener and after it dried, the sealer.  Steps 3 and 4 done so quickly!  The sealer made no visual difference but here's a photo anyway - look how white!!!!

Thennnn finally #5, caulking!  I also took no action photo here but mostly because it was a mini-disaster as my first attempt using a caulk gun.  I finally got it right though.  Took 2 layers though because I didn't put it on thick enough the first time.  

THE REVEAL:


YAYYYYYYY

*Note:  Post contains affiliate links

Thursday, March 8, 2012

project sneak peekery

A shower update is coming soon.. I will say things are looking good!  (And nothing else has fallen off the wall haha).  As I should have mentioned before, the new grout in the shower would have to cure for 48 hours, followed by sealing then caulking, which needs ~36 hours before being exposed to water.  So things aren't officially done, but I will post the end results soon!

In the mean time, of course I had other things going on.  Here's a preview of posts to come (whenever I get to actually doing these things, that is).

1// Get this baby mounted!
This is our new toy (Samsung's UN55D8000 55" 3D LED HDTV)!  He will be mounted on the living room wall oh-so-beautifully on Sunday afternoon, replacing a similar sized but much clunkier version which currently monopolizes the top of the media stand.

2// Pick some paint!  (for the other bathroom, which is due for "renovation" as well)
Note: the top photo was taken on the kitchen floor - I was not sitting in the bathroom drinking tea haha.  

While the bathroom stuff was curing / drying / airing out I occupied myself with plans to make the other bathroom all spiffy too (this is where I have been showering in the interim, thank goodness for 2 full bathrooms).  Of course a repeat of the tile facelift will happen, along with fresh paint and other exciting things.  Now which color...

Sunday, March 4, 2012

bathroom (mis)adventures

To finish up my bathroom "renovation", I wanted to do a thorough cleaning of the shower tile to get rid of gross mildew, staining, and soap scum, and then patch up a few spots where the grout was loose.


All sounds pretty innocent and simple, right? I thought so.

Day 1:
I went to the store for the necessary goods - here is my arsenal:

[Clorox Bathroom Cleaner; Pre-Mixed White Tile Grout; Homax Grout Coating/Whitener; Homax Grout Sealer]
The plan was to:
1// clean grout and tile with the bathroom cleaner
2// clear out any loose grout and fill in all grout holes
3// coat grout with whitener
4// seal the grout
5// re-caulk everything, especially because corners were looking like this (ahhhhhh upclose shots are so scary):


Step 1 went smoothly (but some spots were definitely in need of the grout whitener!) At step 2 things got interesting. Before I started the soap dish looked like this:


Nice big gaps in the grout and of course I wanted to get the loose bits out. Maybe I was being a bit too aggressive, but this happened:


Ahh!! It's hard to tell in the photo, but a lot of the original mortar behind the dish was wet. And when I put the soap dish down, a ton of water poured out of the holes in the back. I panicked for a moment, then realized maybe it wasn't such a bad thing it fell off because the dish wasn't water tight and probably needed to dry out. After pulling mortar pieces down, the shower looked like this:


So pretty, right?! Haha... I also started pulling out the old caulking (shown in the left corner above) to find huge gaps between the tile and tub. Will have to fix that too. Sigh. At this point I turned on the bathroom fan and went out to see my friends - it's a good thing I left the apartment or I probably would have ripped all the tile down.

Day 2:
I started out today with another trip to the store in hopes of finding some manageable quantity of mortar / thin-set / tile adhesive to put that soap dish back up. I was worried I wouldn't find the right thing for a quick repair job, since the stuff is usually sold in 50lb bags. When I was about to give up and buy probably the wrong stuff (mortar crack filler, like for brick walls), I found a nice little 6oz bottle of tile repair adhesive. Yay! And while I was at it I picked up some bathroom caulk and a caulk gun.


The soap dish hole was looking fairly dry (maybe I should have waited longer but I want this done!) so I mixed up a small batch of adhesive and applied to the back of the soap dish.


When I smooshed it on the wall it actually felt secure and suctiony which was very reassuring, but I pulled it off quickly to make sure the back was completely covered.


Success. Now I'm letting it dry for the prescribed 3 hours before grouting supported by masking tape to prevent droopiness)


The adventures will continue...

ps. Some cute encouragement from my dad (yes, diy is the way to go!):


*Note:  Post contains affiliate links

Saturday, February 25, 2012

DIY closet revamp {part 2}

I never posted after revamping my closets back in September. I didn't take proper before photos, so here's one I dug up from before I moved in:

The bedroom has two closets - one awkwardly behind the bedroom door and the other in the mini-hallway to the bathroom. The closets had typical bi-fold doors with dated brass knob (and also notice the white walls and carpet). Inside was also pretty basic and certainly did not maximize storage - notice how neither closet has a proper hanger rod and how the left closet just has a super deep shelf in the left (deeper) side:


My closet upgrades happened in two phases:
1// I replaced the interior shelves with shiny new ones from the Container Store (elfa).
2// I converted the bi-fold doors to "French" doors and added new handles.

Going in chronological order, the interior upgrades
allowed for multiple shelves as well as multiple levels of hanging space (hallway closet):

At the bottom there is space for a small suitcase and bins for clothes awaiting hand washing and dry cleaning.

This upgrade also really took advantage of the space in the other closet, which has two different depths. On the left (deeper) side I was able to include an additional hanging rod for dresses, and shoe racks running the entire depth. There's even room for my steamer to hide in there now!


Some of the major advantages to converting the doors are the increased access and the extra hanging space on the back of doors for purses (above) and a mirror (yes, that's little versions of my sister and me!):


As for the bi-fold to French door conversion, I first took the doors down and removed the hinges which had previously held the two pieces together. In typical bi-fold doors, one side is anchored to the floor and the top track while the other side slides. I modified the sliding side to also be anchored by adding hardware to allow both doors to swing open independently (ahh the closeup is ugly I promise I vacuum!):


After patching up holes from the hinges and adding a fresh coat of paint, I attached a magnet to each closet door frame and metal strikers to the backs of the newly separated doors to keep them from swinging around all crazy:


Finally, I added the new handles and voila!


For funsies, the before and after again: